Set Up Your Property
Configure your rooms, rates, policies, and photos to get your property ready for guests.
Once you've created your account and connected your Google listing, it's time to set up your property in Synoveo. This guide walks you through the essential steps to get your rooms, rates, and policies ready.
Before You Begin
Have the following information ready:
- Room types and counts -- How many rooms, beds, or rental units you have
- Base rates -- Your standard nightly prices
- Property photos -- At least 5-10 high-quality photos of your property
- Cancellation and check-in policies -- Your standard terms
- Amenities -- What your property and rooms offer (Wi-Fi, parking, breakfast, etc.)
Step 1: Select Your Property Type
Synoveo supports four property types. The type you choose determines how rooms and units are configured.
| Property Type | Unit Structure | Example |
|---|---|---|
| Hotel | Private rooms | 20-room boutique hotel |
| Bed & Breakfast | Private rooms | 6-room B&B |
| Hostel | Dorm beds + private rooms | 30-bed hostel with 2 private rooms |
| Vacation Rental | Whole properties | 3 rental apartments |
Your property type is detected automatically from your Google listing category. You can change it manually in Settings if needed.
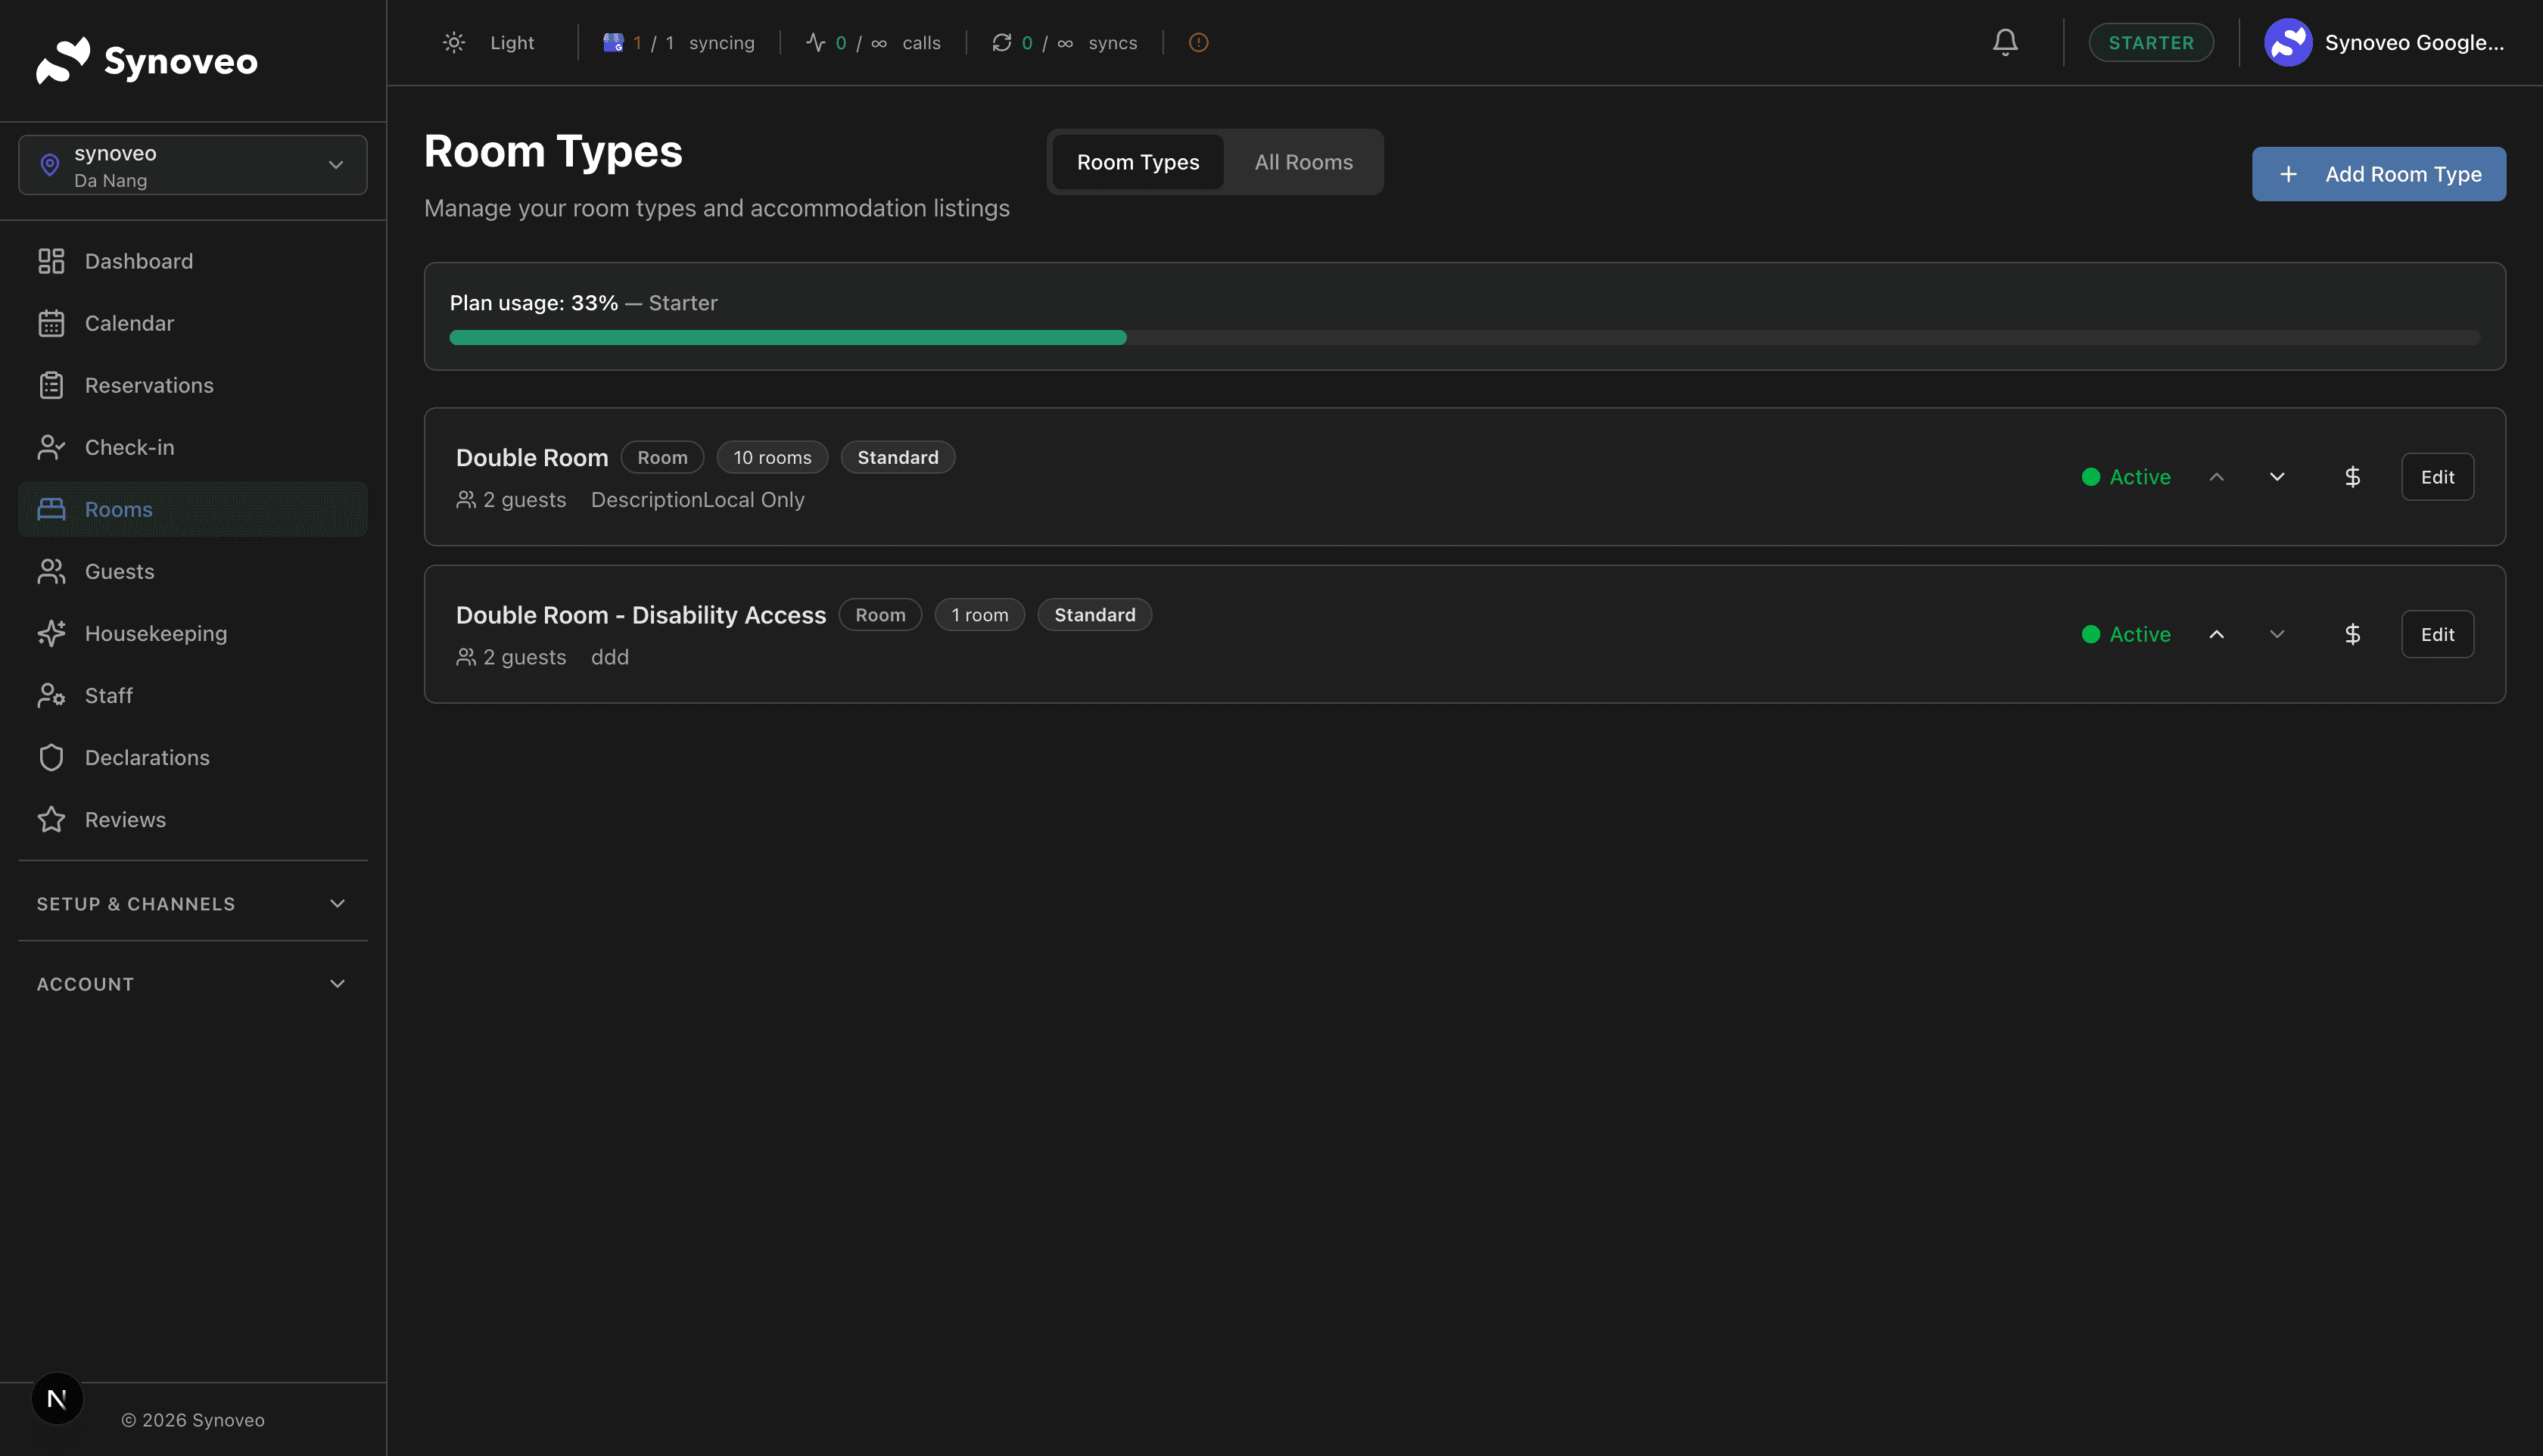
Step 2: Add Your Rooms
Navigate to Rooms in the sidebar to start adding your accommodation.
For Hotels and B&Bs
Click "Add Room"
Click the Add Room button at the top of the Rooms page.
Enter Room Details
Fill in the room information:
- Room name -- A descriptive name (e.g., "Deluxe Double," "Garden Suite," "Room 101")
- Room type -- Standard, Deluxe, Suite, etc.
- Max occupancy -- Maximum number of guests
- Bed configuration -- Number and type of beds (King, Queen, Twin, etc.)
- Base rate -- Your standard nightly rate for this room
- Description -- A short description highlighting what makes this room special
Add Room Photos
Upload photos of the room. Guests rely on photos when choosing where to stay, so include:
- The room itself (from multiple angles)
- The bathroom
- The view (if applicable)
- Any special features
Set Room Amenities
Check the amenities available in this room:
- Air conditioning / heating
- Private bathroom
- TV
- Mini fridge
- Safe
- Balcony
- And more
Save and Repeat
Save the room and repeat for each room type. If you have multiple identical rooms (e.g., 5 Standard Doubles), you can set the room count rather than creating each one individually.
For Hostels
Hostels have a mix of dorm beds and private rooms:
- Dorm rooms: Set the number of beds per dorm. Each bed counts as 1 unit for billing purposes.
- Private rooms: Same setup as hotels. Each private room counts as 5 units.
For Vacation Rentals
Each rental property is added as a separate unit:
- Property name -- e.g., "Seaside Apartment" or "Mountain Cabin"
- Max occupancy -- Total number of guests
- Bedrooms and beds -- Full bed configuration
- Property amenities -- Kitchen, washer/dryer, parking, pool, etc.
Each vacation rental listing counts as 10 units for billing. If you manage 3 properties, that's 30 units -- which fits in the Starter plan.
Step 3: Configure Base Rates
Navigate to Rates in the sidebar to set up your pricing.
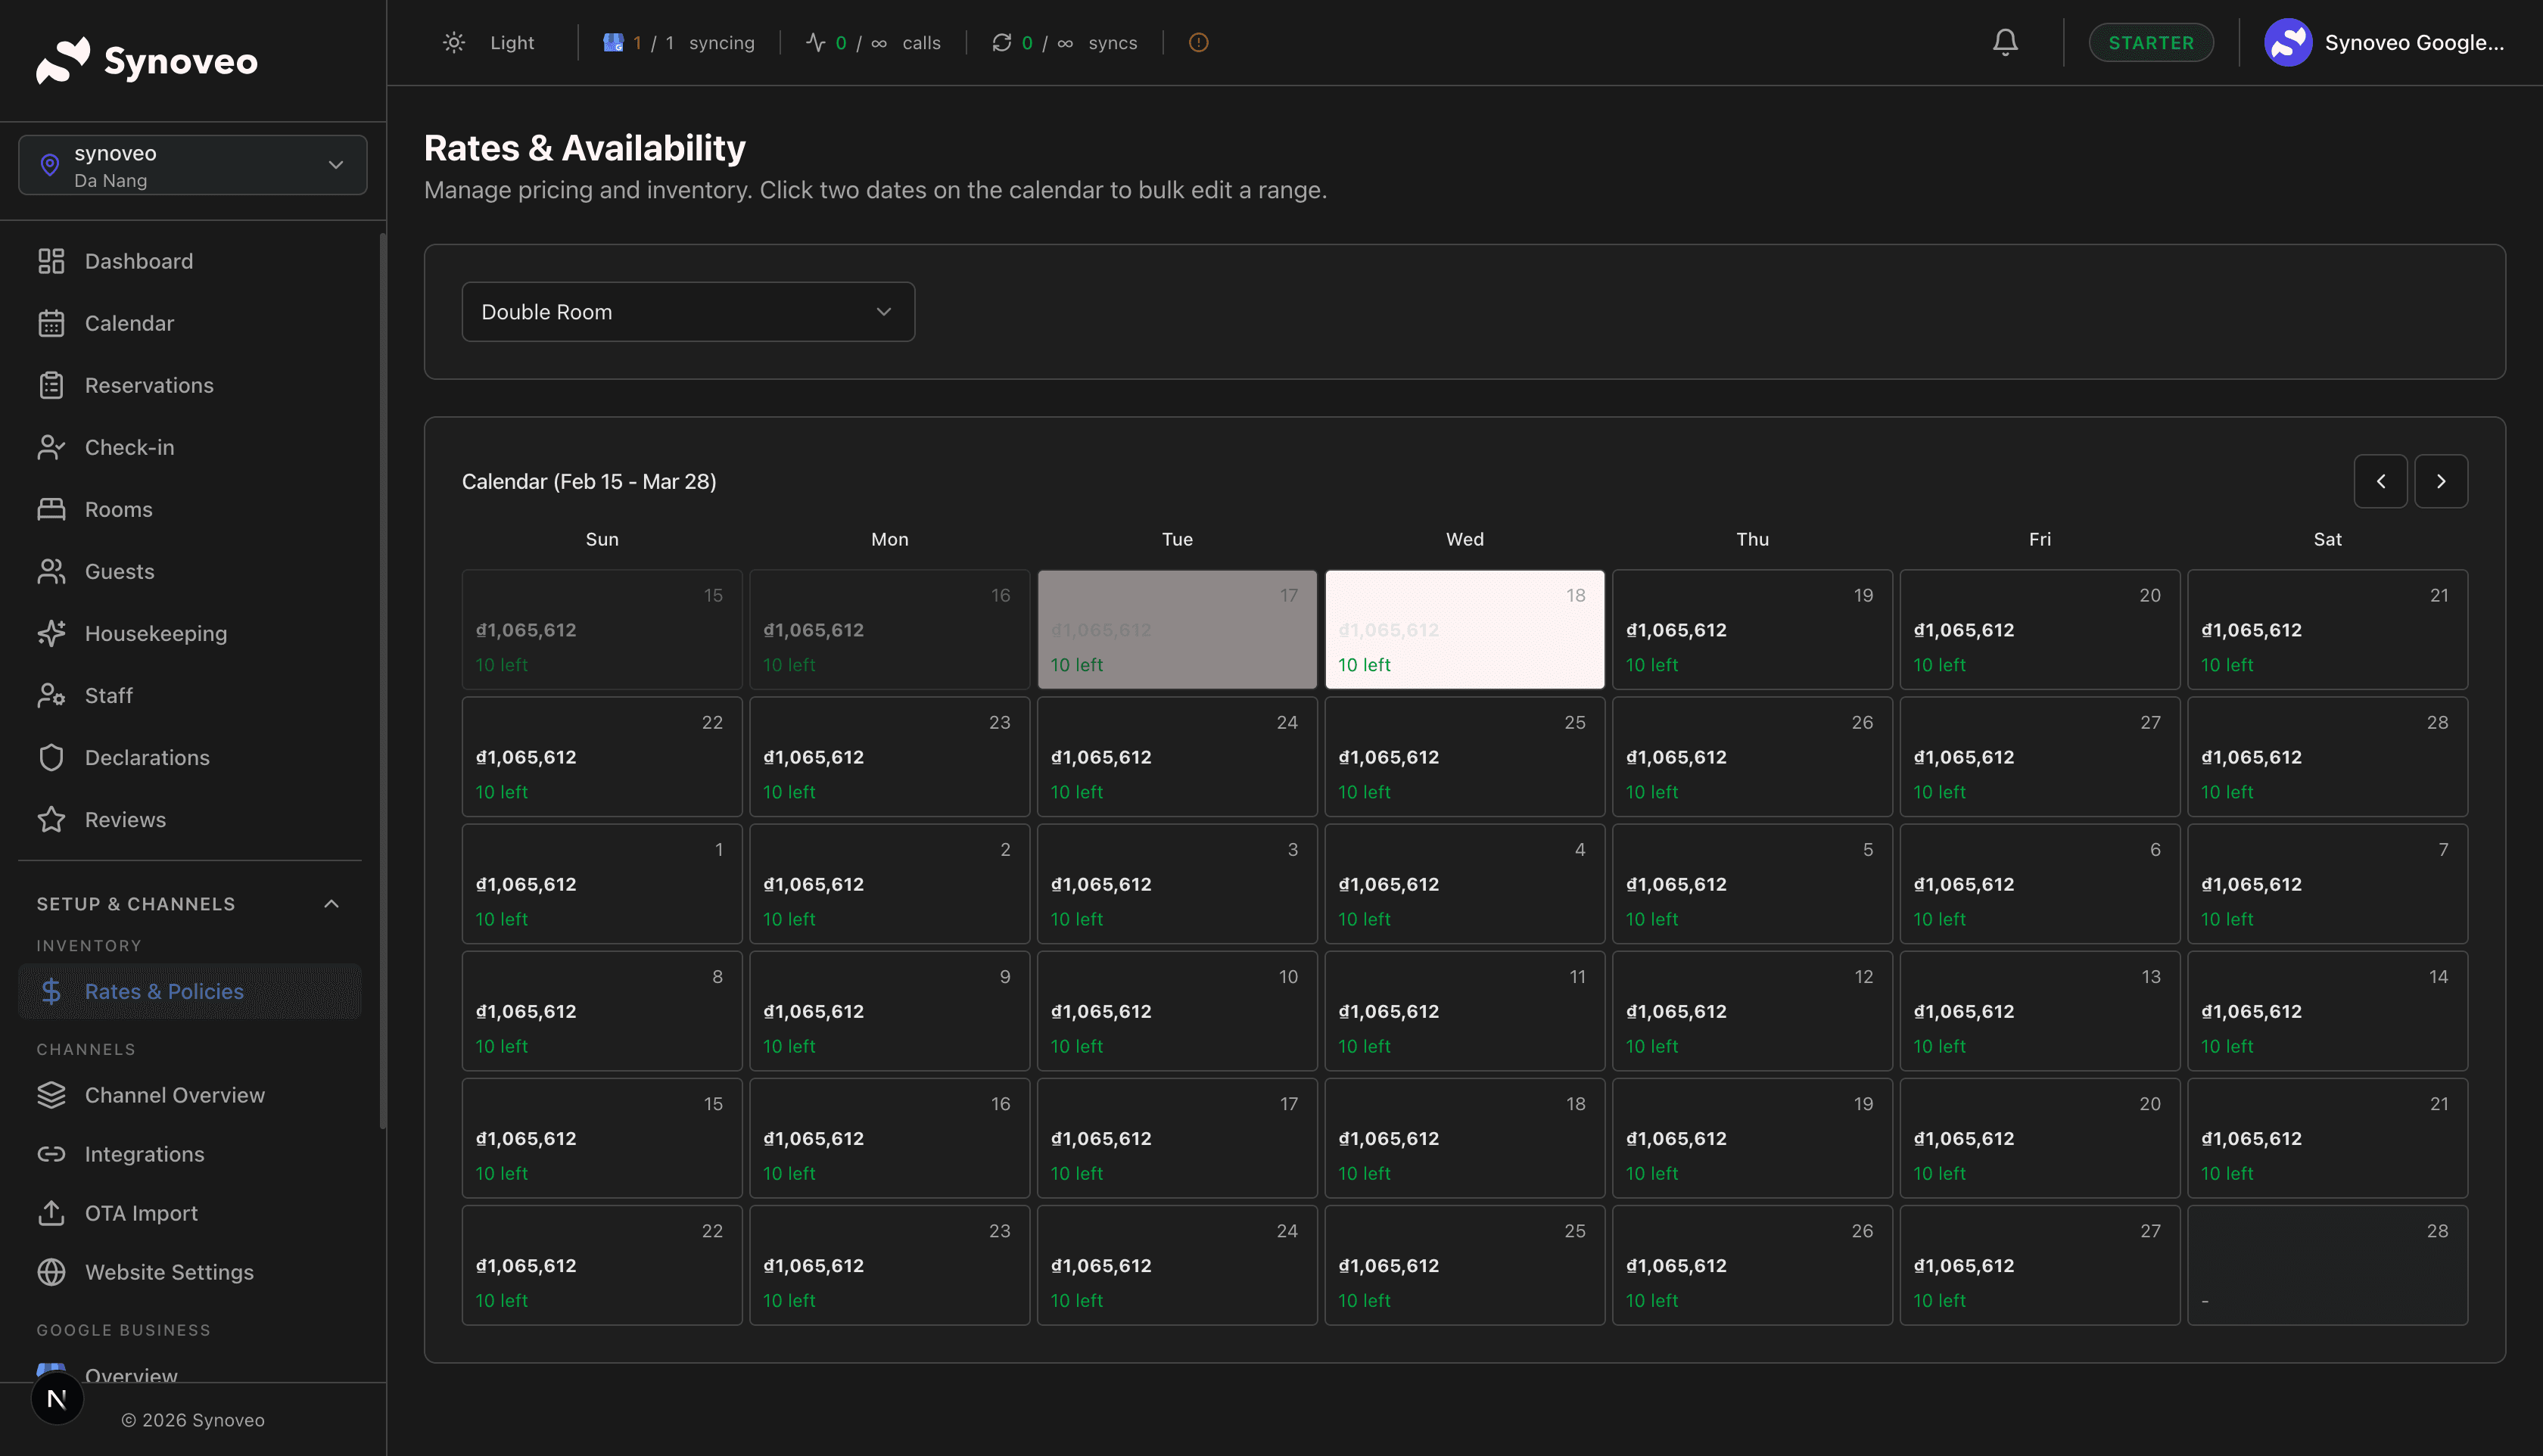
Set Base Rates
For each room type, set the base nightly rate. This is your standard price before any adjustments.
Add Rate Plans (Optional)
Create additional rate plans for different scenarios:
| Rate Plan | Use Case |
|---|---|
| Standard | Your default rate |
| Non-refundable | Discounted rate with no cancellation |
| Weekly | Reduced rate for stays of 7+ nights |
| Last-minute | Special pricing for same-day or next-day bookings |
Set Seasonal Adjustments (Optional)
Adjust rates for high and low seasons:
- Peak season -- Increase rates during busy periods (holidays, summer, local events)
- Off-season -- Lower rates to attract guests during slower periods
Rates you set here will be distributed to all your connected booking channels. You can also set channel-specific rate adjustments later.
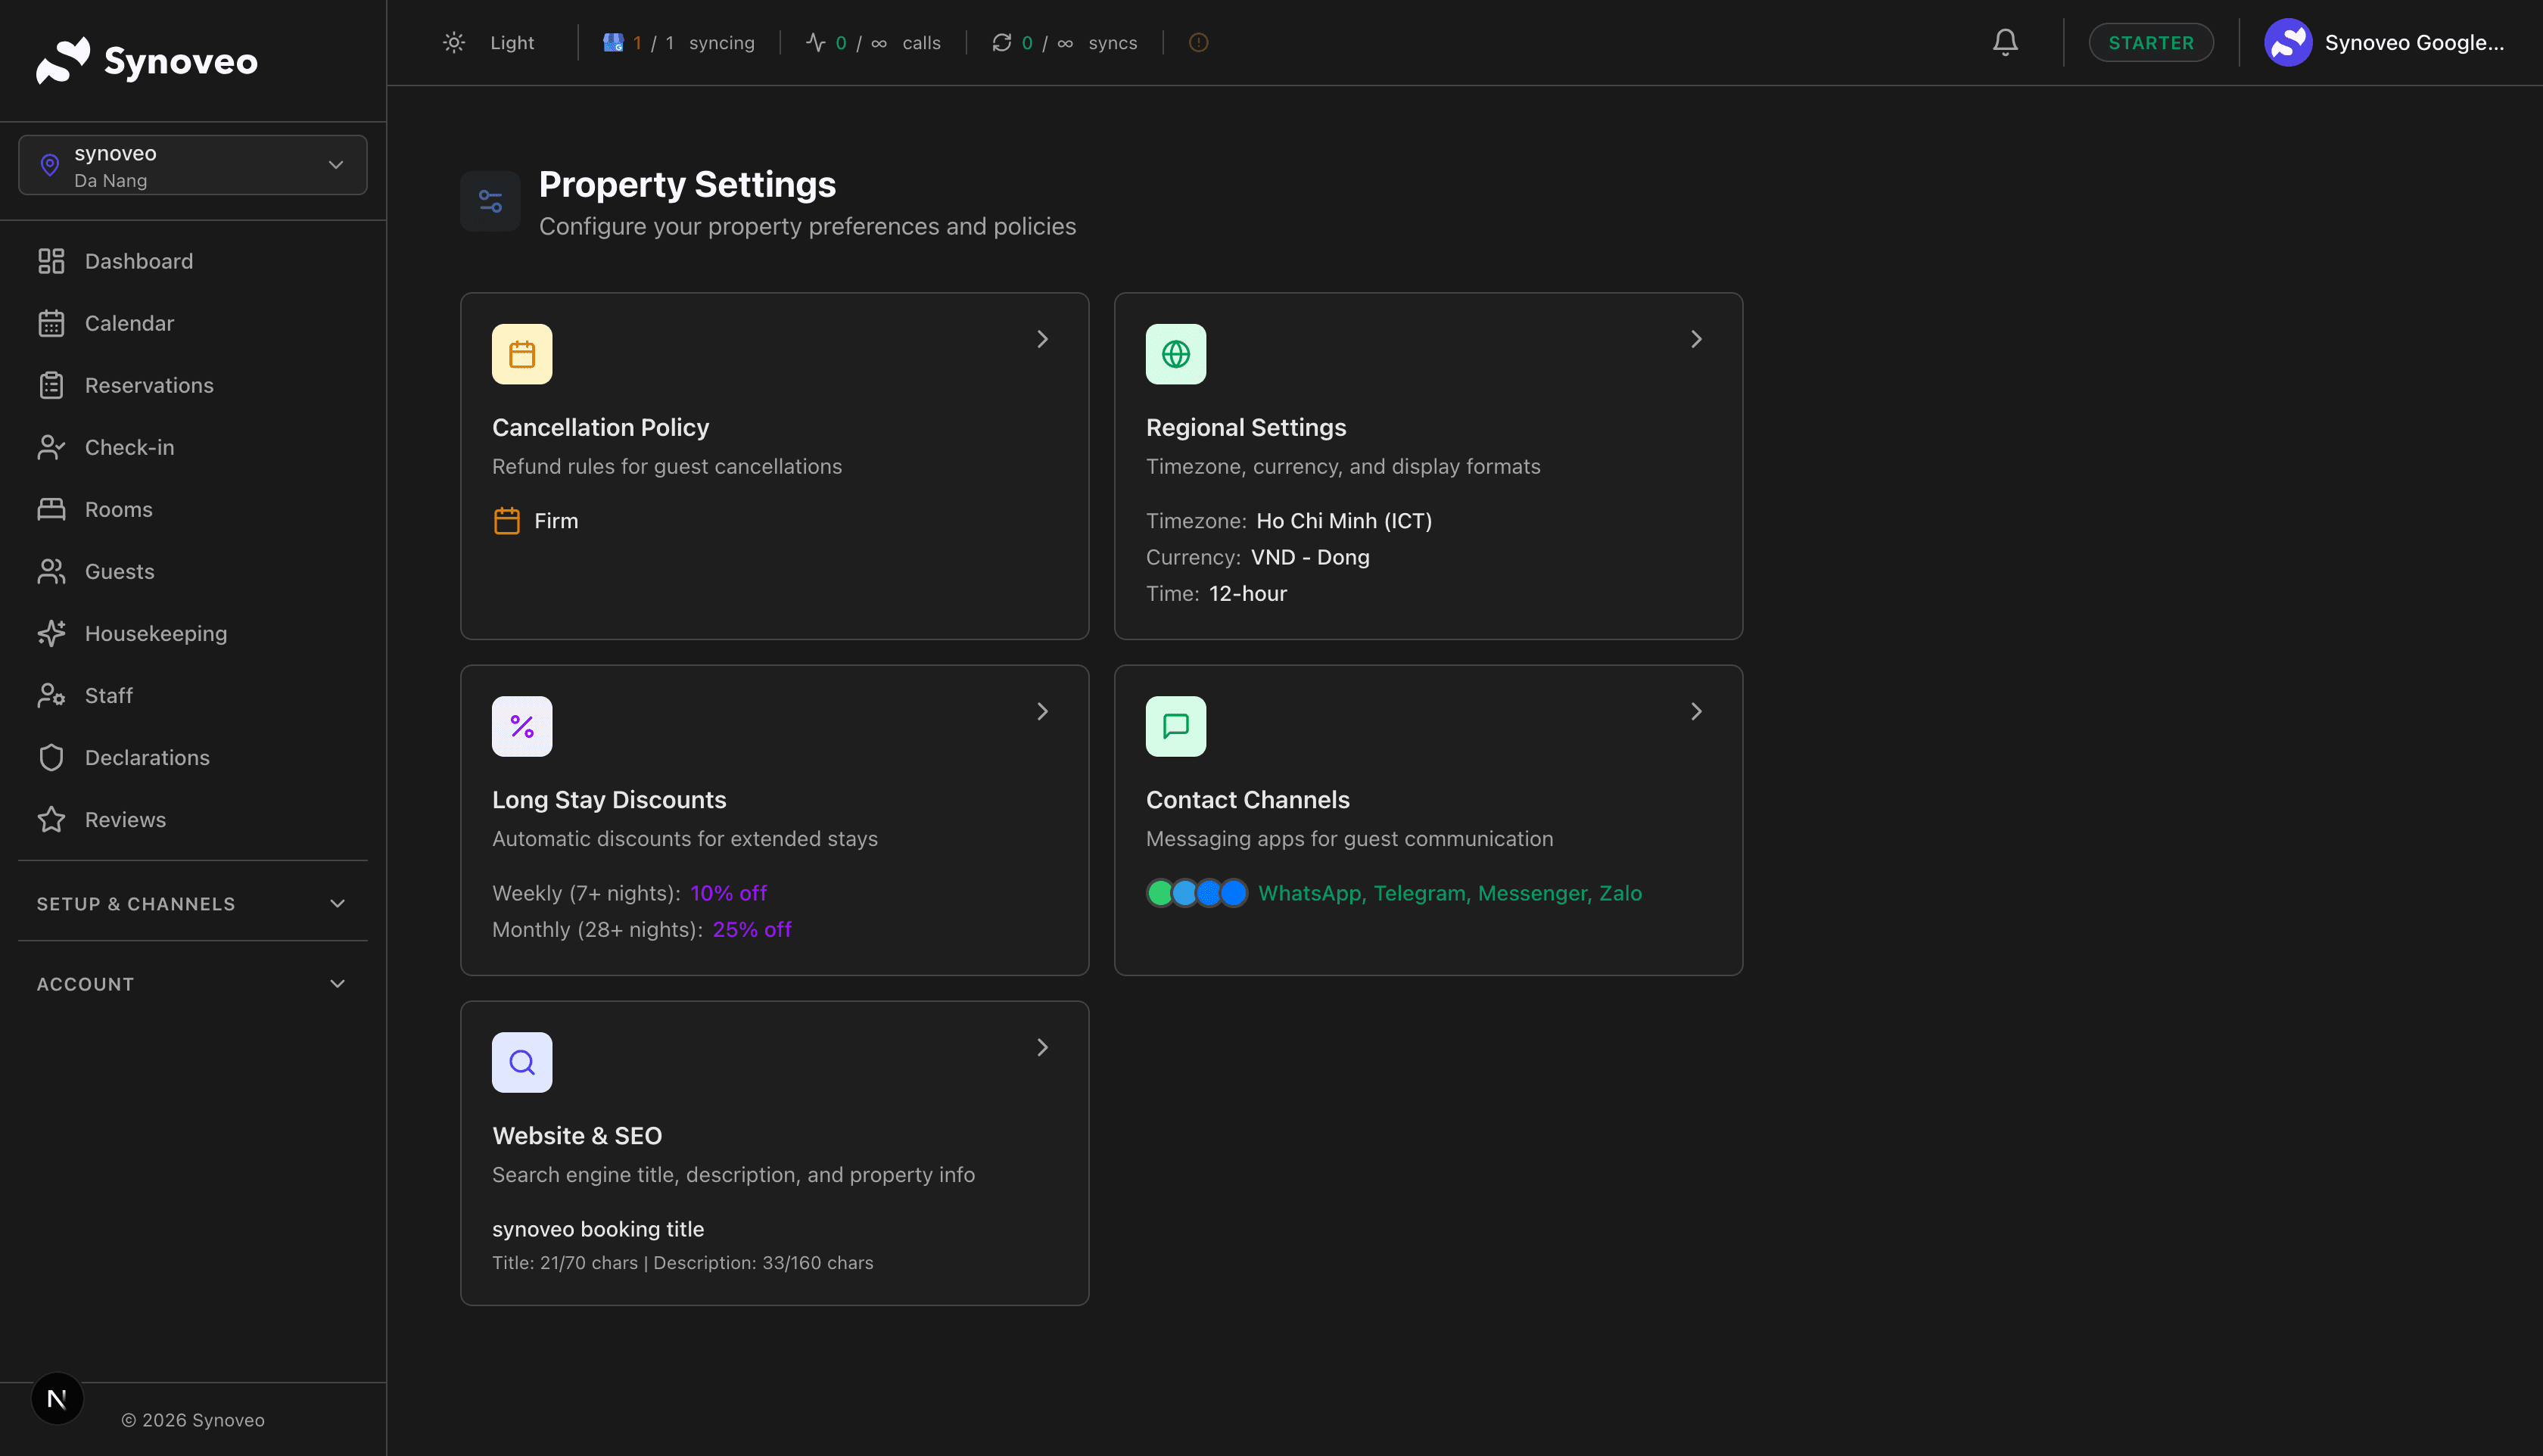
Step 4: Set Your Policies
Navigate to Settings in the sidebar to configure your property policies.
Check-in and Check-out
- Check-in time -- When guests can arrive (e.g., 3:00 PM)
- Check-out time -- When guests must depart (e.g., 11:00 AM)
- Early check-in -- Whether you offer it and at what cost
- Late check-out -- Whether you offer it and at what cost
Cancellation Policy
Choose a cancellation policy that matches your business:
| Policy | Description |
|---|---|
| Flexible | Free cancellation up to 24 hours before check-in |
| Moderate | Free cancellation up to 5 days before check-in |
| Strict | Free cancellation up to 14 days before check-in; 50% refund after |
| Non-refundable | No refund after booking |
| Custom | Define your own terms |
Children and Extra Beds
- Whether children are allowed
- Age ranges for child pricing
- Extra bed availability and charges
Pets
- Whether pets are allowed
- Any size or breed restrictions
- Pet fees
Step 5: Upload Property Photos
Navigate to the Photos section to add property-level images. These photos appear on your direct booking website and can be pushed to your Google listing.
Recommended photos:
| Photo Type | What to Include |
|---|---|
| Exterior | Front of the building, entrance, signage |
| Lobby / Common areas | Reception, lounge, sitting areas |
| Dining | Restaurant, breakfast room, bar |
| Amenities | Pool, gym, spa, garden, parking |
| Surroundings | View, neighborhood, nearby attractions |
Properties with 10 or more high-quality photos get significantly more bookings. Invest in good photography -- it pays for itself quickly.
Photo guidelines:
- Minimum resolution: 1920 x 1080 pixels
- Format: JPEG or PNG
- Maximum file size: 10 MB per photo
- Landscape orientation works best
Step 6: Review Your Setup
Before going live, review your property configuration:
- All rooms or units are added with correct details
- Base rates are set for each room type
- Check-in and check-out times are configured
- Cancellation policy is selected
- Property photos are uploaded
- Amenities are listed
- Property description is complete
What Happens Next
Once your property is set up, you're ready to:
- Subscribe to a plan that fits your property size
- Connect booking channels like Booking.com and Airbnb
- Launch your direct booking website
- Start accepting reservations
Your rooms and rates will be distributed to connected channels, and your direct booking website will go live with real-time availability.
Tips for a Strong Start
- Complete every field -- The more details you provide, the better your property looks to guests and search engines
- Use descriptive room names -- "Oceanview King Suite" is better than "Room 3"
- Set competitive rates -- Check what similar properties in your area charge on Booking.com or Airbnb
- Upload many photos -- More photos mean more bookings. Aim for at least 5 per room and 10+ for the property overall
- Write a compelling description -- Highlight what makes your property unique: location, history, amenities, or personal touches